You probably wouldn’t say outright that your part design is pushing mold costs up. But at moldsteells, we have opened too many 3D files for home appliance projects and seen the same few features drive quotations higher again and again. Some increases are big enough to make customers ask whether the quote is wrong. These five features are not edge cases. They are routine issues we keep seeing and explaining in appliance mold projects. This list is not meant to cover everything, but fixing these items can make the quotation look much better.
1. Undercuts on Exterior Side Walls Keep Adding More and More Slides
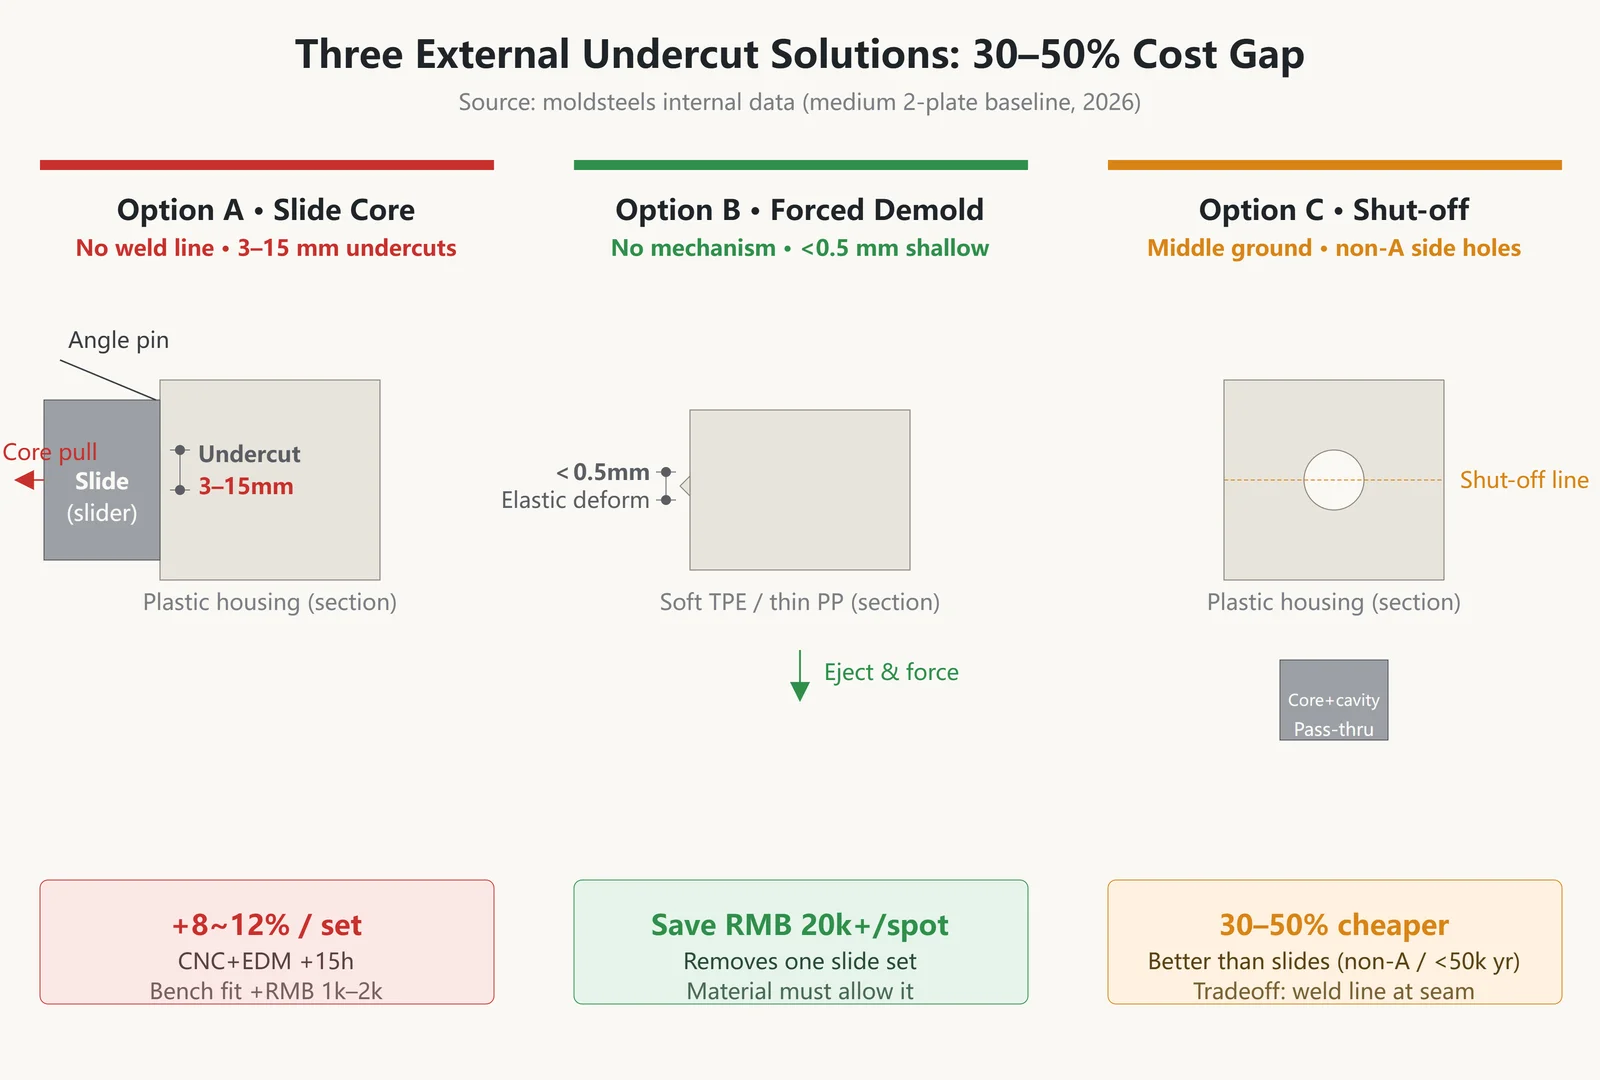
This is probably the most common structural cost trap we see in home appliance drawings. A snap on the housing side wall, a side recess for a button opening, or an internal catch in the battery compartment—any feature that cannot release in the mold opening direction—requires a side-action mechanism. External undercuts use slides, while internal undercuts use lifters. The mechanisms differ, but the cost logic is the same: each added slide set typically adds about 15 hours of CNC and EDM time, pushes total mold cost up by 8% to 12%, and also increases bench fitting work.
The cost does not rise in a straight line. It jumps by steps. For the same medium-size two-plate mold, machining cost for a mold with no slides may fall in the range of $5,926 to $8,889. Add four slides, and it can jump directly from $10,370 to $14,815. One structural change can raise the cost by 75%—and that still does not include the slide steel, Heat Treatment, and later wear maintenance. In many home appliance projects, the reason a mold quote doubles is buried in those few undercuts on the side wall.
But an undercut does not always require a slide. If the undercut depth is less than 0.5 mm and the material allows elastic deformation, such as soft TPE or thin-wall PP, forced demolding can eliminate one slide mechanism entirely. That one change alone can mean a cost difference starting at $2,963. For a slightly deeper side hole, a shut-off feature can also replace a slide core pull. That can cut mold costs by 30% to 50%, though the tradeoff is a weld line at the seam. If the area is not a Class A cosmetic surface, or the annual volume is below 50,000 parts, a shut-off is often more cost-effective than a slide. If the part needs a clean appearance with no visible weld line and a stable supply in the hundreds of thousands per year, then a slide core pull becomes the fallback option. Undercut depth drives the mechanism choice: shallow undercuts in soft materials may allow forced release, with the exact limit depending on material and wall thickness, while rigid plastics are far less forgiving. Undercuts of 3 to 15 mm usually use angle-pin slides. Above 15 mm, hydraulic core pulling becomes necessary. The more complex the mechanism, the higher the steel cost, machining hours, and long-term maintenance cost.
2. Uneven Wall Thickness Creates Sink Marks Waiting on the Back Side
A drawing may show a reinforcing rib root where the local wall thickness jumps from 2 mm straight to 4 mm. During injection molding, the thicker area cools more slowly and shrinks more. By the time the thin wall has already frozen, the thick section is still shrinking—and that leaves a sink mark on the back side. The same mechanism also causes crater-like shrinkage around screw bosses and gas traps or burn marks in wall transition areas. In the end, the tool has to be modified again and again.
Home appliance housings follow common industry wall-thickness ranges: 2.5 to 3.5 mm for large appliances such as refrigerators, washing machines, and air conditioners; 1.5 to 2.5 mm for small appliances such as hair dryers and electric toothbrushes. If the design moves outside that range, the mold will pay the price. If reinforcing ribs are necessary, their thickness should be only 50% to 70% of the nominal wall. Wall-thickness transitions should be controlled within a 25% change. These are basic rules in Injection Mold design. Following them in the drawing stage removes a large share of sink-mark risk.
The hidden cost sits in cooling. Once wall thickness becomes uneven, cooling time often has to increase by 50% to 80% to suppress sink marks, and cooling already takes more than half of the molding cycle. If the cosmetic surface also requires high gloss and weld lines must be avoided, the usual solution is a sequential valve-gate hot runner that uses pin timing to eliminate visible weld lines. That system costs noticeably more than a standard hot runner and also needs a timing controller. A sudden wall-thickness change does not just make the mold more expensive. It also drives up part costs throughout production.
3. Large Mirror-Gloss Areas Double Both Steel and Polishing Cost
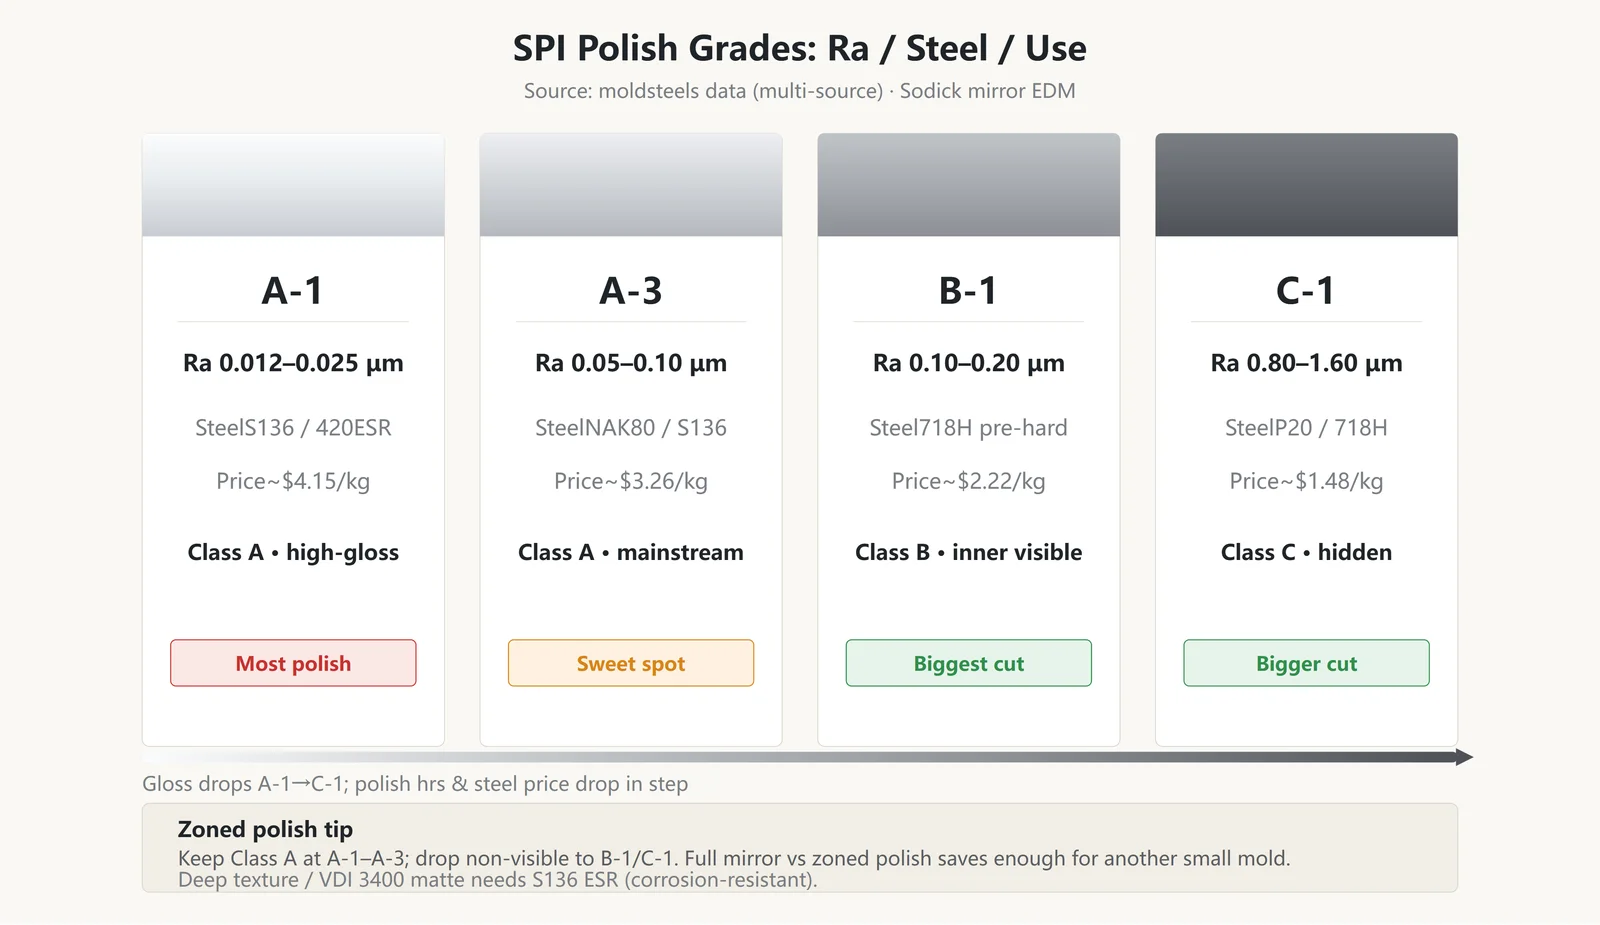
If the cosmetic surface requires an SPI A1 mirror finish, the entire steel and polishing process must move up a level. SPI A1 requires a surface roughness of Ra 0.012 to 0.025 µm. The mold steel usually needs to be hardened S136 at HRC 54 and hand-polished with 6000-grit diamond paste. Not every steel can be polished to that level.
The steel price gap is the most direct cost factor. For the same cavity steel, standard P20 costs about $1.48 per kg, while mirror-grade S136 costs about $4.15 per kg—nearly three times as much. On a large cavity set, that alone can create a price gap of more than ten thousand yuan. In home appliance panels, standard cosmetic surfaces often use NAK80 pre-hardened steel because it does not need hardening and polishes efficiently. Corrosion-resistant applications, such as refrigerators and kitchen appliances, may use S136. But S136 requires hardening and carries a higher distortion risk, so it is not worth using on every part. That tradeoff is often where quotes begin to separate.
The real savings come from zoned polishing. Most home appliance panels use ABS, and this material can achieve excellent appearance from SPI A1 to A3—but that does not mean the entire mold surface must be polished to A1. Non-visible areas can be reduced to B1 with 600-grit paper or even C1 with 600-grit stone. That cuts polishing hours dramatically. For textured surfaces, the standard is VDI 3400. The deeper the texture, the higher the corrosion-resistance requirement for the steel. Shallow textures of 0.1 to 0.2 mm can work with standard steel. Deep textures above 0.5 mm are better matched with S136 ESR. Otherwise, the etching solution can attack the steel, and the tool may need repair soon after mass production begins. The price gap between polishing the full mold to a mirror finish and polishing by zone can be large enough to cover an extra small mold.
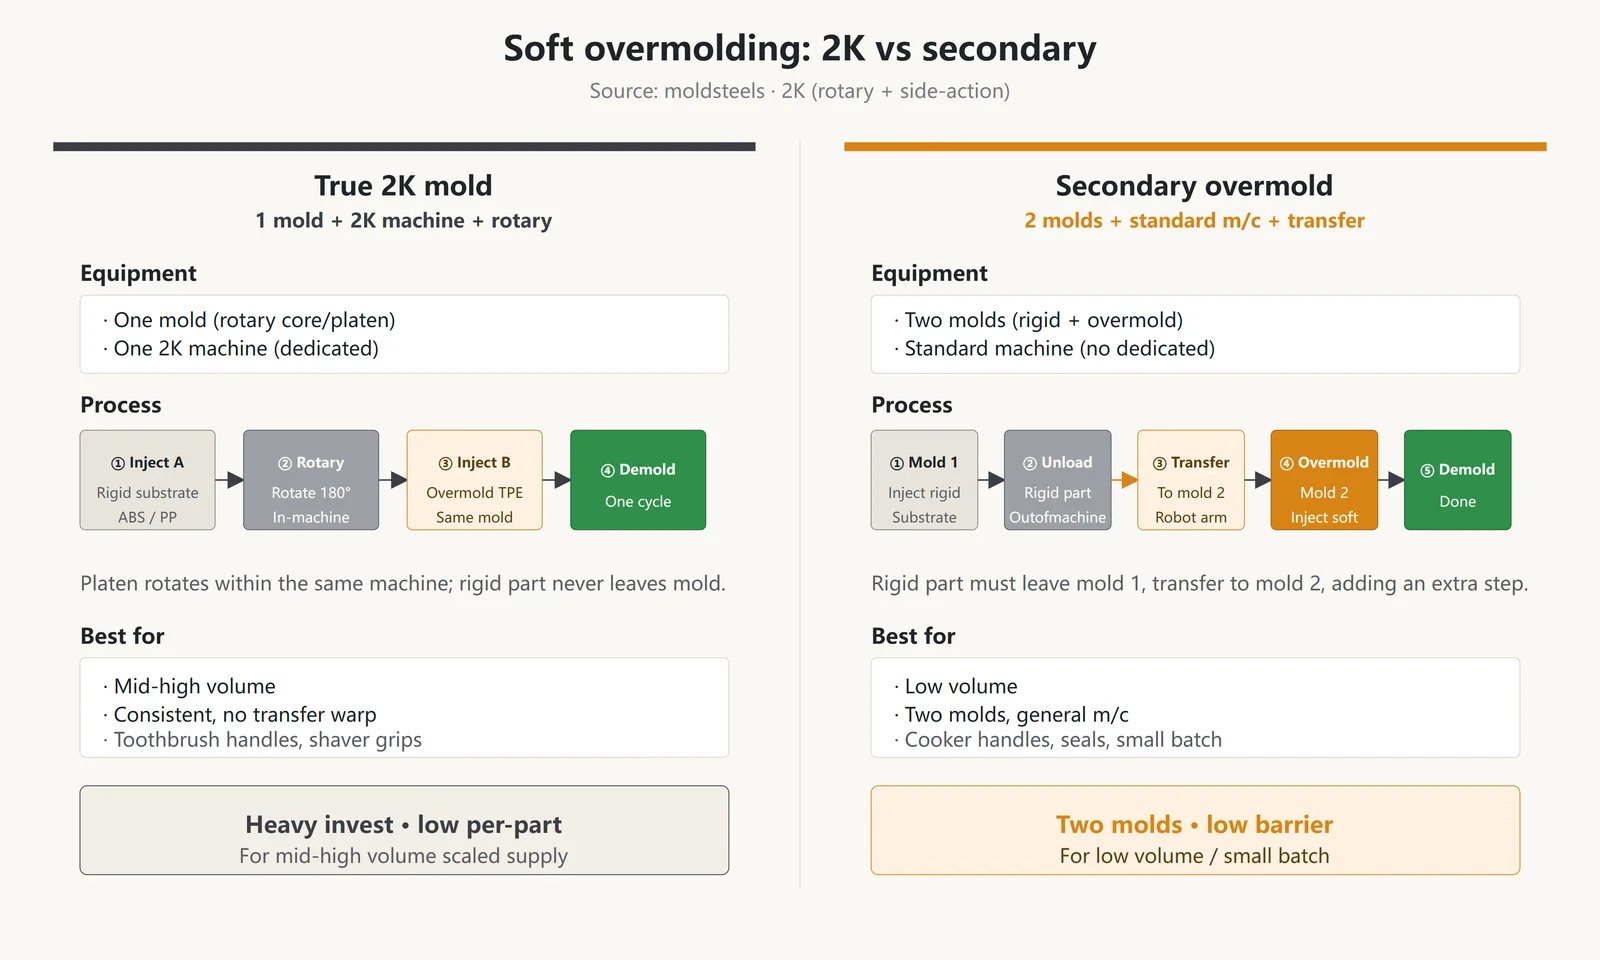
4. No Plan for Soft-Touch Overmolding, So the Choice Is 2K Mold or Two Separate Tools
Soft-touch grips on electric toothbrush handles, anti-slip edges on shavers, rice cooker handles, and integrated sealing rings are all common overmolded structures in home appliances. A single-color mold cannot handle them. The choice is either a 2K mold or secondary overmolding. The two solutions use completely different mold structures, and they are not quoted in the same price range.
A true 2K mold uses one mold on a two-shot injection machine with a rotating platen that turns 180 degrees. Two materials are injected in sequence, and the part comes out in one cycle. Both mold and machine investment are heavy. A secondary overmolding tool can run on a standard injection machine, but it requires two separate molds. First, the rigid substrate is molded. Then the rigid part is transferred into the second mold and overmolded with a TPE layer. That means two molds and one extra transfer step in the middle.
Both options cost noticeably more than a single-color mold, but the cost structure is different. A 2K mold makes more sense for medium to high volume because the machine investment can be spread over output. For lower volume, secondary overmolding is usually the better fit. The right choice depends first on annual volume and the soft-material coverage area, then on the mold supplier’s proposed solution—not on the assumption that the more expensive option is always better. There is also a hidden risk in overmolding: poor adhesion. TPE does not naturally bond well to every rigid plastic, and if the rigid substrate surface still has mold-release residue, adhesion gets worse. Plasma or flame treatment may be needed first to increase surface tension. ABS may need to move from 32 dynes up to 42 to 46 dynes before bonding becomes reliable. That adds another process step. When overmolded parts begin to delaminate after some time in production, the root cause is often here.
5. Critical Tolerances Fixed at ±0.01 mm
If a drawing specifies a tolerance of ±0.01 mm, the first question is whether the part really requires it. Standard injection-molded parts usually work well at a stable tolerance of ±0.05 to 0.1 mm. Once the drawing calls for ±0.01 mm, high-speed CNC is no longer enough. The tool will need Wire Cutting / EDM, which means slower machining, higher cost, and a clear jump in total mold price.
Tighter tolerance does not simply mean better precision. It means higher cost and greater manufacturing difficulty. Move from IT10 to IT8, and the mold gets noticeably more expensive. Move again to IT7, and the mold cost jumps another level, while production yield may drop below 90%, which makes the math unattractive. In home appliances, the dimensions most often over-specified are cosmetic assembly gaps and mismatch at the parting line. If the Class A surface mismatch is 0.05 mm and the gap is 0.1 mm, the human eye can already barely detect it. If the drawing still insists on ±0.02 mm, it is only adding cost. B-side and C-side mismatch and gap can usually be opened up another step.
Multi-cavity molds are another hidden cost multiplier. The more cavities there are, the more cavity-to-cavity variation combines with material shrinkage fluctuation, making tolerance harder to hold. On an 8-cavity mold, even a tolerance of ±0.05 mm may not achieve a CPK of 1. In that case, the choice is either to loosen the tolerance or to add in-line inspection and compensation—which is another layer of investment.
These five design features are far from the full picture in home appliance mold pricing, but fixing them can make a quotation look much better. The next step is simple: review this checklist before sending out the drawing, or send the 3D file to the mold supplier for a DFM review first, then decide the plan after the parting line, slides, lifters, wall thickness, and draft angle are laid out clearly. Structural optimization is better done in the DFM stage than after a quotation falls apart and the drawing has to be revised later. At moldsteells, this is exactly the kind of work we handle every day. In mold flow analysis and DFM review for home appliance injection molded parts, we call out structural cost traps early, revise the design where possible, and switch process routes where it makes sense. If these structural problems only show up at the T0 trial stage, every round of mold modification costs real money.