Where do molds fail? Moldmakers who also run repair shops know best. Molds rarely break down during a frantic production crunch. If an issue pops up during a shift, operators catch and fix it right on the spot. The real damage happens during two unsupervised stretches: the months a mold sits in storage and the exact moment it goes back on the press. The first is rust. The second is oil staining across production batches because workers didn’t clean off the storage rust preventative.
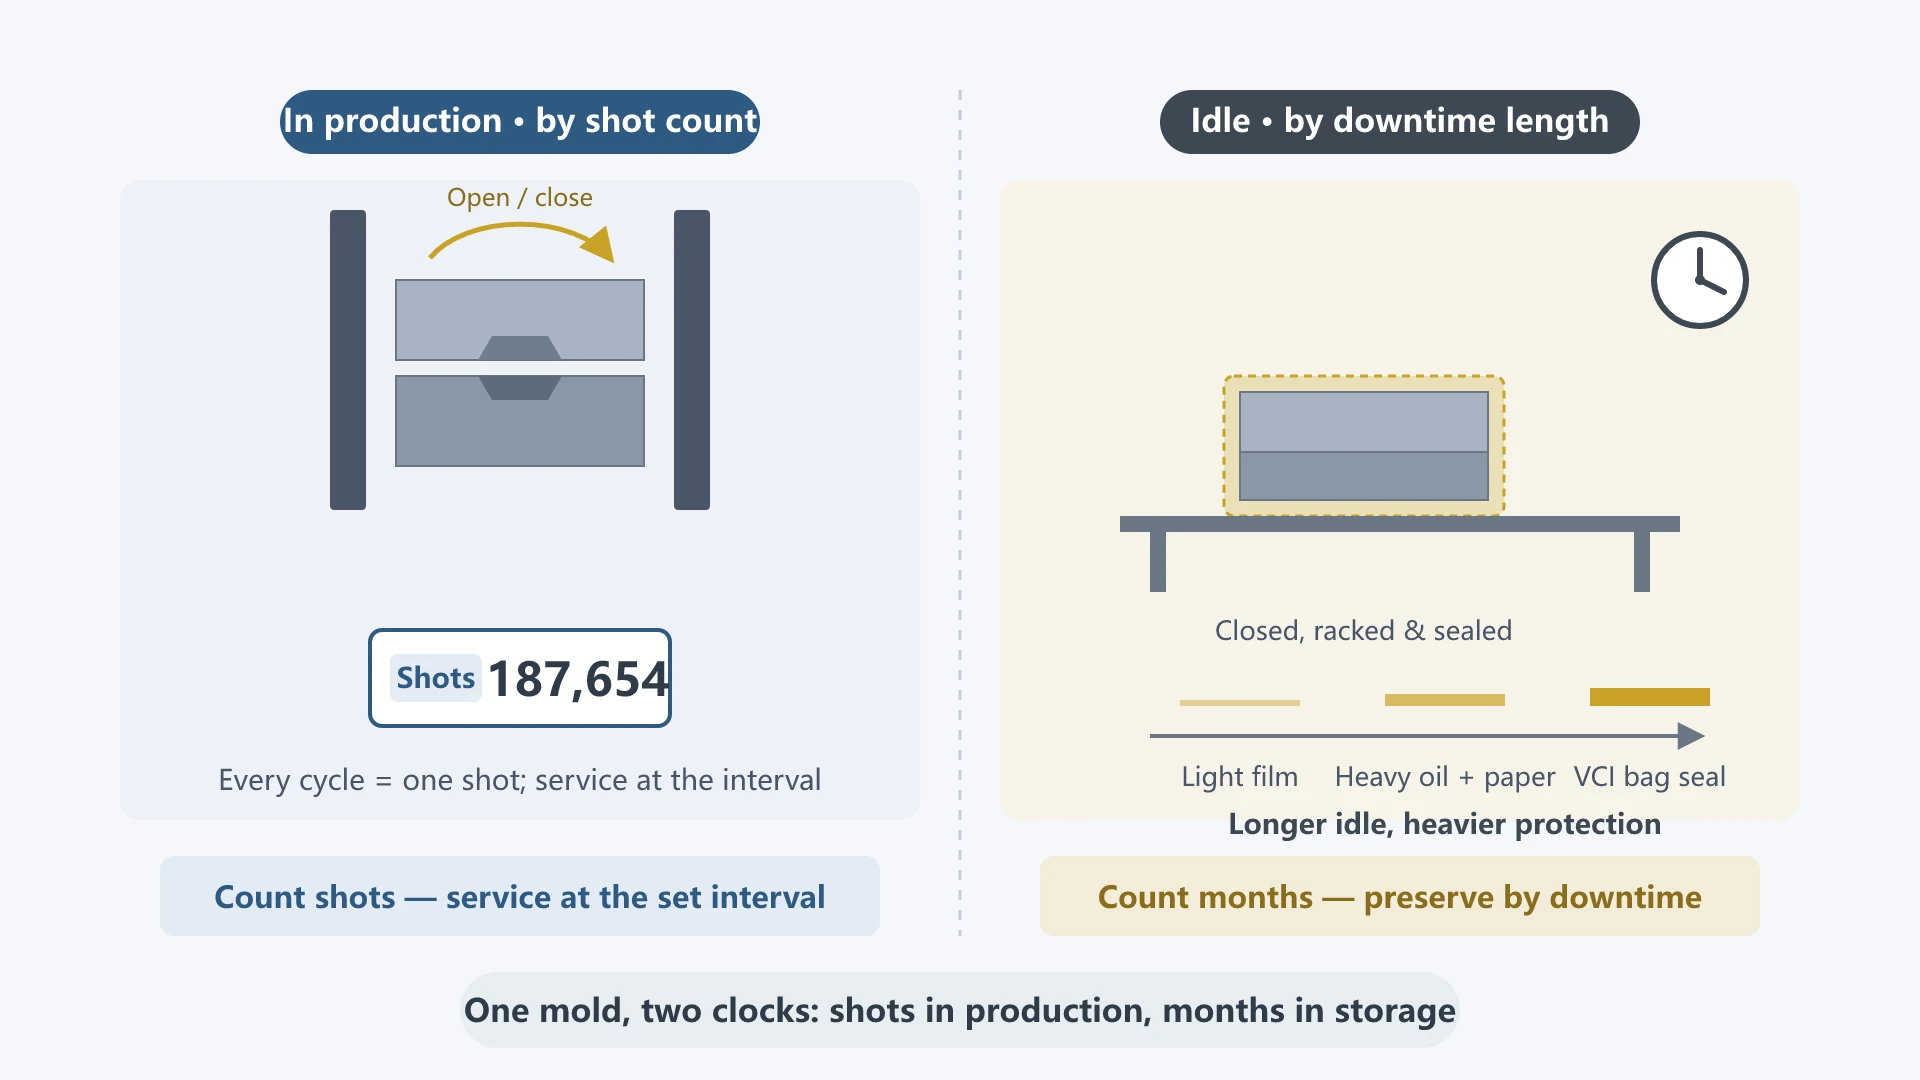
Maintenance follows two parallel tracks: track shot counts during production and track elapsed time during downtime. “Shot count” means the total mold open-and-close cycles since commissioning. Think of it like a vehicle: a daily driver gets serviced by mileage, while a parked car gets serviced by elapsed time. In production, count the shots; in storage, count the months. Schedulers must track the first number—knowing exactly when to pull a mold for preventive maintenance. Recommended industry benchmarks range from 30,000 to 300,000 shots. Here is where those numbers come from and how to choose the right interval for your tooling.
When to Pull a Mold for Service Based on Shot Count
People often miscalculate shot counts by counting molded parts instead of mold cycles. An 8-cavity mold produces eight parts per cycle—that is, eight parts, but only one cycle of wear. If you schedule maintenance by part count, an 8-cavity mold reaches its service mark at only one-eighth of its actual wear life. You end up pulling the mold far too early, wasting labor and adding unnecessary teardown wear. Single-cavity molds are simple: one part equals one shot.
Tooling maintenance falls into three tiers: Level 1 is daily, press-side maintenance without teardown—clean the mold cavity, lubricate ejector pins and guide pins, and grease slides with high-temperature grease (standard grease breaks down under mold temperatures). Level 2 is scheduled bench maintenance where you pull and disassemble the mold for deep servicing. Level 3 is long-term storage preservation before racking. While these tier frameworks are common, shops often struggle to pinpoint the exact shot counts for each tier.
The 30,000-shot figure is widely cited. It originated in a 2019 publication by a Taiwan mold association, which used it as an example: service every 30,000 shots, then reset the counter. Note that this was an illustrative example, not a rigid standard. Western maintenance programs typically follow a three-tier rhythm: minor service at 50,000 shots, intermediate maintenance at 150,000 shots, and a full teardown overhaul around 300,000 shots. Shop-floor practices vary—a veteran injection molding manager with 12 years of experience noted they run routine maintenance at 50,000 and 100,000 shots, saving full teardowns for 300,000 and 600,000 shots. The table below organizes these benchmarks into an actionable schedule.
Mold Maintenance Interval Matrix
Combining industry association examples, Western maintenance standards, and real-world shop data yields a clear decision matrix you can hand directly to production planning:
| Shot Count | Maintenance Level | Action Checklist |
|---|---|---|
| End of shift | Press-side daily maintenance (no teardown) | Clean mold cavity, oil ejector pins and guide pins, grease slides with high-temperature grease, visual cavity check. |
| 30,000–50,000 shots | Minor PM (pull from press) | Check parting line for clamping damage, clear vent channels, inspect O-rings and guide bushings, check hot runner heat zones. |
| 100,000–150,000 shots | Deep PM | Descale cooling channels and test flow rate, restore cavity polish, replace all return springs regardless of wear, inspect slide wear plates. |
| ~300,000 shots | Major overhaul (full teardown) | Measure steel components for dimensional wear and replace out-of-spec parts, crack-test cooling lines, replace all wear items, blueing check on parting lines, release after first-article inspection. |
| Glass-filled resins, hot runner molds | Shortened dedicated cycles | Service every 5,000 to 15,000 shots; re-machine vent depth every 10,000 shots. |
This table outlines industry reference ranges rather than mandatory standards: 30,000 shots comes from association examples, while 50,000 and 150,000 mark the starting baselines for Western maintenance routines. Actual schedules shift based on resin abrasiveness, moving part count, and mold steel grade.
These numbers vary widely, and none are inherently right or wrong. Maintenance schedules shouldn’t be one-size-fits-all. When setting intervals in our shop, we evaluate three key factors:
First is the resin: abrasive materials like PVC or glass-filled polymers actively scour steel. Cut maintenance intervals by 30% to 50% for these materials; some shops service glass-filled molds every 5,000 to 15,000 shots. Second is the number of moving components: slides, lifters, and ejector sleeves each introduce a potential wear point. Third is the mold steel grade and build quality. Matching the resin to the tool structure clarifies the right number: simple two-plate molds running PP or PE can comfortably start at 50,000 shots. Complex molds with slides and lifters running ABS or PC often drop to 25,000 shots. Glass-filled resins and hot runners demand the shortest intervals. Use the matrix as a baseline, then fine-tune it after inspecting wear patterns across the first few thousand shots.
Tool wear is inevitable, and failure spots are predictable: gates wear from resin shear, vents clog with carbon deposits, parting lines bruise from over-clamping, ejector pins snap, and slides gall. Every maintenance task targets these high-risk areas. The Taiwan association report also highlighted frequent root causes: broken ejector pins, unreturned pins, trapped parts in the mold cavity, and missing subcomponents. These failures strike unexpectedly. As shop managers note, sending emergency repairs to outside toolrooms takes weeks—downtime production lines can’t afford. In deep PM, cooling channels are the most neglected area. Scale builds up quietly inside internal water lines, showing symptoms only in creeping cycle times and dimensional drift. Cooling accounts for roughly 60% of the entire molding cycle. If a mold loses two seconds per shot over a 500,000-shot run, do the math on the wasted machine hours. That is why minor PM at 50,000 shots requires cooling flow rate benchmarking, followed by descaling and retesting at 150,000 shots.
Counter resets also have clear rules: reset the counter to zero once maintenance is complete. Three scenarios determine the count:
- If serviced ahead of schedule, restart the count from the service date.
- If delayed due to production crunches and completed after the run, restart from the actual shot count at service.
- If pulled early for tooling repairs, treat the repair as a completed PM and reset the counter.
To avoid disruptions, build a buffer into your tracking logs: if the target is 30,000 shots, notify production planning at 25,000 shots so schedulers can allocate maintenance windows. Never wait until the counter hits the hard limit to trigger an emergency shutdown. A maintenance schedule means nothing if production planning doesn’t reserve machine time for it.
Step-by-Step Procedure for Post-Production Mold Teardown and Storage
When a mold comes off the press, preservation must follow a strict sequential order: clean the mold cavity, blow out water lines, let the steel cool completely, apply rust preventative and grease moving parts, and finally clamp the mold closed for racking. Reversing these steps ruins your corrosion protection.
Once the machine stops, immediately shut off the cooling water and wipe down the mold faces. If steel drops below the dew point, ambient humidity instantly condenses into water droplets on the cavity surface. Delaying wipe-down by an hour gives rust an hour head start. Clean resin residue while the mold retains residual heat: flash, debris, and degraded carbon wipe off easily. Never leave PVC residue overnight; PVC breaks down at elevated temperatures into acidic vapors that attack cavity steel even after shutdown.
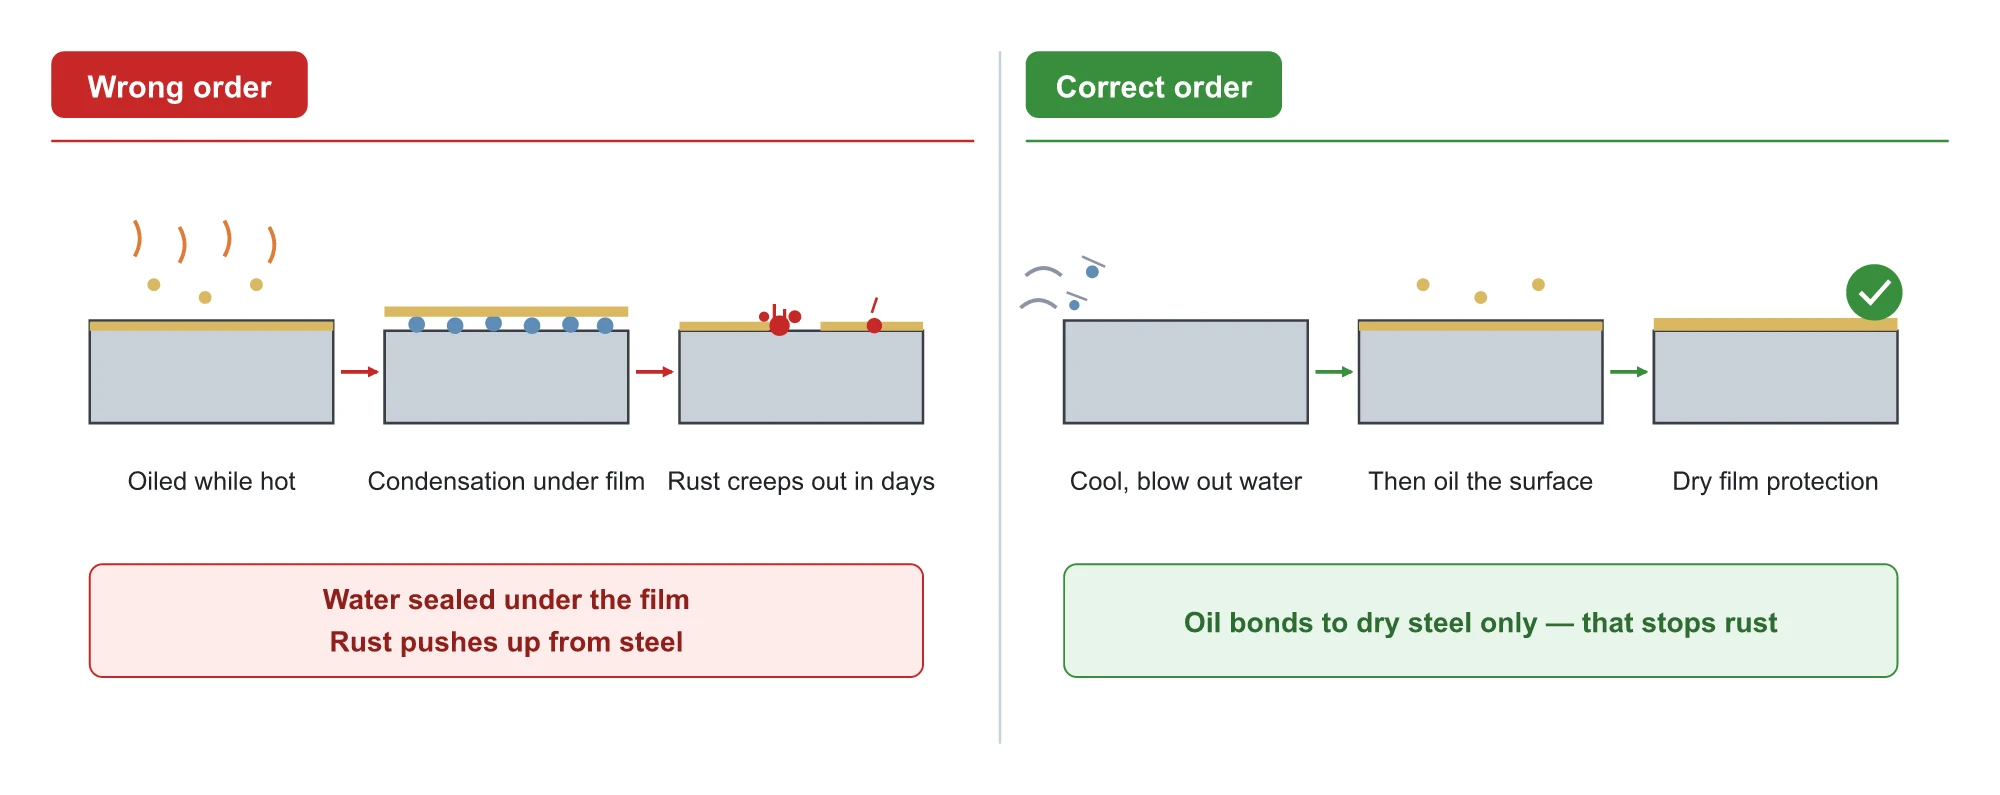
Next, blow dry all cooling channels with compressed air before applying any oil. Spraying oil over damp steel traps moisture beneath the oil film, letting rust grow from the inside out. The oil fails to protect the tool and instead locks water against the bare steel.
Cooling down is the step technicians most frequently get backwards. If you spray rust preventative on a hot mold, the oil forms a film immediately. As the tool continues to cool past the dew point, trapped moisture condenses under the film. Sealed beneath the oil layer, this moisture can’t evaporate. Within days, rust emerges beneath the coating. The rust preventative ends up acting like a wet blanket. The only correct method: let the mold cool down to room temperature naturally before spraying.
Use the right lubricant for each zone: spray rust preventative across molding surfaces like cavities and cores; apply grease to exposed moving components like guide pins and slides—use high-temperature grease on slides. Finally, plug the gate and clamp the mold shut.
Storage Preservation Tiers by Downtime Duration
Once the teardown sequence is complete, match preservation to the expected downtime. Many shops treat a weekend shutdown the same as a six-month layup—sliding the tool onto a rack and walking away. Industry practice categorizes downtime into five distinct tiers, each with dedicated procedures. Daily end-of-shift care is simply the shortest tier; even brief shutdowns require disciplined care.
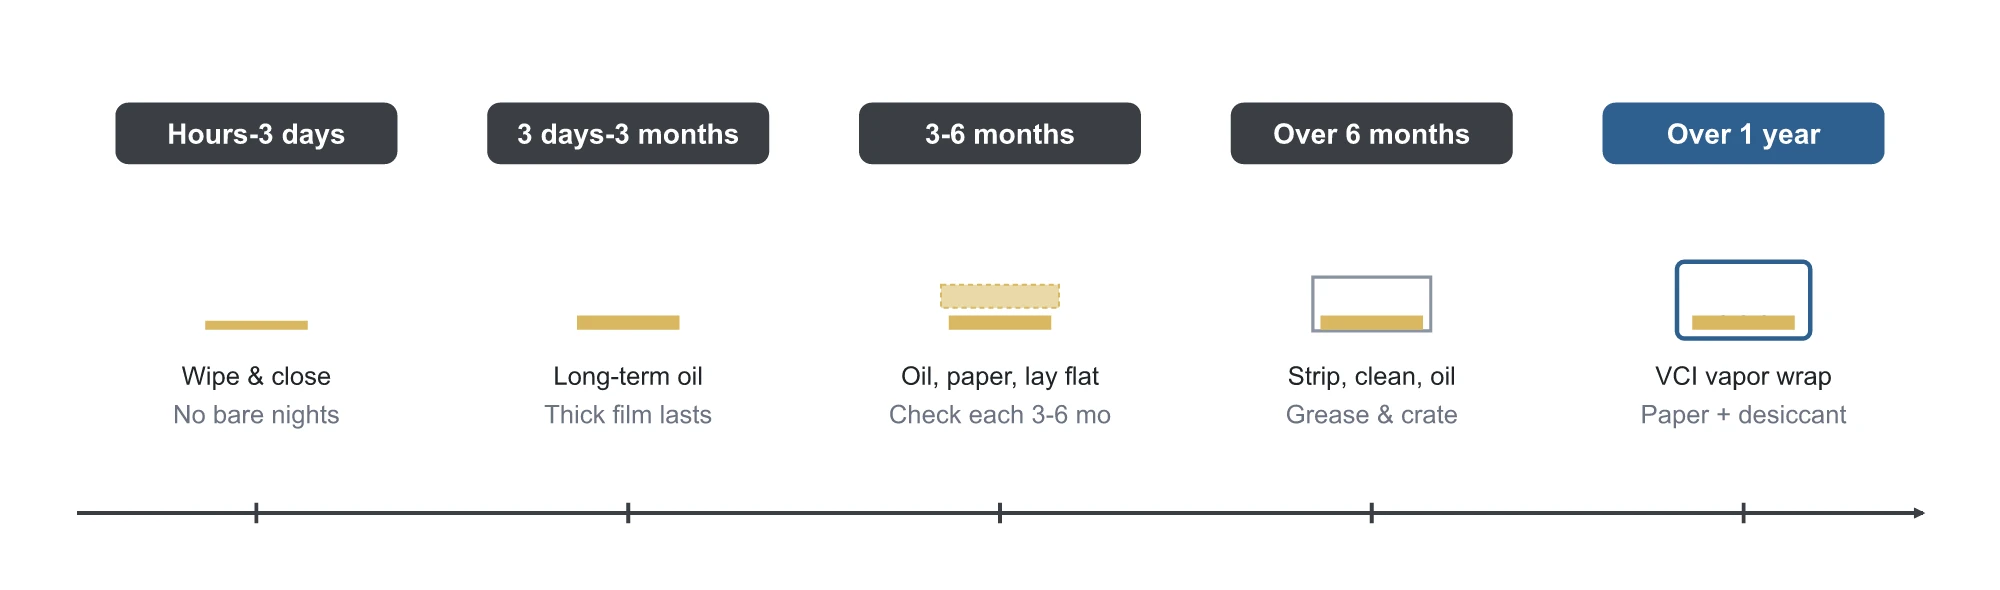
- A few hours to 3 days: Wipe mold faces clean and clamp the tool shut to bridge a weekend—never leave it open. Bare carbon steel can develop rust spots overnight. When possible, apply a thin coat of fast-evaporating rust preventative oil, which leaves a dry film that is easy to clean before restart.
- 3 days to 3 months: Switch to a long-term rust preventative. Evaporative sprays work well for short downtime because they leave a clean film; for multi-month storage, use oil-based rust inhibitors that form a thick, durable protective barrier.
- 3 to 6 months: Storing a mold this long brings genuine risk. The three-month mark is an industry threshold where idle tooling shifts to time-based maintenance. Inspect and replace lubricants periodically to prevent degraded oil from attracting moisture. Step up protection: perform a thorough clean, apply a generous layer of heavy rust-preventative oil, wrap the tool in barrier paper or bubble wrap, clamp it, and rack it. Storage orientation matters: store molds flat or upright on designated rails, never tilted. Leaning a mold long-term can distort plates over time. Re-inspect every 3 to 6 months and reapply oil if the film dries out.
- Over 6 months: Treat storage prep like a full bench overhaul. Disassemble the mold completely; wash all components; coat cavities with heavy, long-term preservation oil; pack exposed slides and pins with grease; wrap in plastic or crate the tool; and clearly label mold identification records.
- Over 1 year: Deploy Vapor Corrosion Inhibitors (VCI). VCI chemicals vaporize into an active gas that penetrates hard-to-reach crevices where spray nozzles can’t reach. Use a three-layer setup: inner wrap of VCI paper, outer sealed VCI bag, and internal desiccant packs. Heavy oil can’t reach deep ejector pinholes or insert seams, but vaporized inhibitors penetrate every gap. Done properly, VCI protection lasts over two years. If a rust inhibitor claims a 1- to 3-year rating, unseal and inspect the mold at the designated expiration mark rather than relying solely on product claims.
These five tiers reflect standard industrial escalation. Procedures vary by shop, but the core principle holds: the longer the tool sits, the heavier the seal.
Three Humidity Thresholds for Mold Warehousing
Inside the warehouse, monitor relative humidity (RH) against three clear benchmarks:
- 50% to 60% RH is the optimal storage sweet spot.
- Above 60% RH: run industrial dehumidifiers to pull levels back down to 40%–50% RH.
- Above 70% RH: corrosion accelerates rapidly. This red line comes directly from Misumi technical engineering data, which notes that rust progresses rapidly once humidity exceeds 70%. These three thresholds tighten progressively.
Why is 70% RH the critical tipping point? At lower humidity levels, moisture on steel forms scattered microscopic droplets, slowing oxidation. Once humidity crosses 70%, moisture forms a continuous liquid film, effectively submerging the steel surface. As Japanese tooling manuals point out: rust is a mold’s worst enemy—once it takes hold, rust removal takes vastly more time and labor than preventive maintenance.
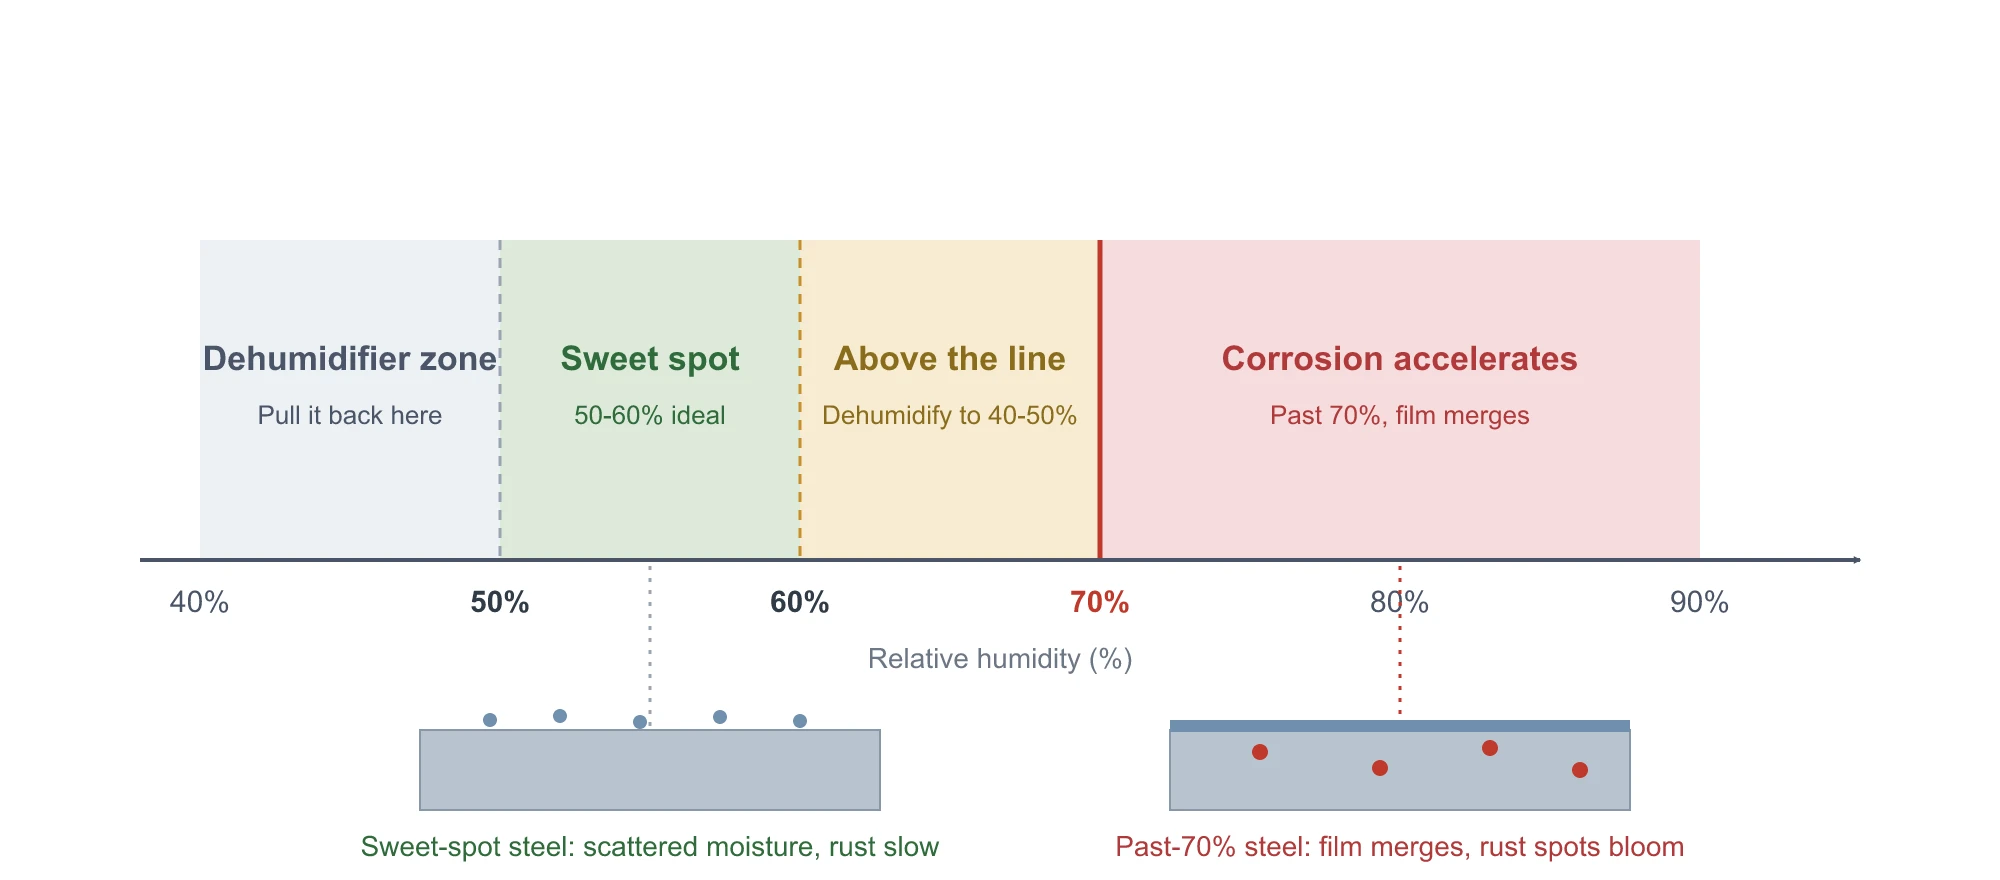
During southern China’s humid monsoon seasons, warehouse humidity routinely surges past 80%, leaving damp walls. Skipping rust protection under these conditions is like dunking your mold in water.
Facility management basics also protect your tooling:
- Store high-frequency molds in accessible front racks for rapid tool changes during rush jobs, placing low-frequency tools deeper in storage.
- Enclose every mold in a sealed plastic bag and tape over open orifices like gates.
- Maintain clear tags and digital tracking logs documenting tool ID, shot counts, and service history. Without logs, locating molds and assessing maintenance status becomes pure guesswork. If your facility lacks dedicated climate-controlled storage, industrial dehumidifiers paired with sealed plastic wrapping will maintain these three humidity lines.
The final hurdle arrives on restart day. When pulling an oiled mold from storage, degreasing comes first. Incomplete degreasing causes residual oil to seep along cavity and core details onto molded parts. Clear or optical parts suffer most, showing immediate oil blemishes and causing entire production batches to fail inspection.
Use two primary cleaning agents: dedicated mold cleaner or mineral spirits. For blind corners and deep ribs, flush with solvent, let it soak, and blow dry with compressed air. Run several sample shots before ramping up to full production.
To simplify restarting cleaning in the future, consider two preservation alternatives:
- Wax-based protective coatings that melt and flush out naturally as the mold heats up.
- No-clean evaporative rust preventatives, where you simply scrap the first few trial shots and run normal production right away. Both options cost slightly more per can but eliminate manual degreasing labor.
Half of a mold’s useful life is decided in the Warehouse
An international tooling buyer once shared the service history of a veteran mold: it ran across three injection molding plants and was eventually retired as a backup tool. Looking back, he couldn’t recall the mold ever entering a toolroom for emergency repairs—it saw only disciplined preventive maintenance. Molds that degrade in storage share a common failure mode: the damage occurs unseen, and rust appears only when the crate is unsealed for production. Proper storage preservation can’t be improvised; it must be executed step-by-step according to scheduled downtime tiers. Maintenance manages wear during production; preservation stops corrosion during downtime. Half of a mold’s total lifespan depends on these two disciplines.
Execution boils down to three core habits:
- Log shot counts and notify production planners early to reserve maintenance windows.
- Select the right preservation tier based on expected downtime length.
- Clean and degrease mold surfaces thoroughly before restarting production.
At moldsteells, we specialize in high-precision injection mold manufacturing. If your tooling is scheduled for downtime and you want guidance on proper storage preservation, or if you need an evaluation of your mold’s maintenance condition, share your tooling details with us. Our engineering team will review your tool line by line and provide tailored maintenance and preservation recommendations.