The phone rings at 9 PM. It’s your mold maker: “T0 trial tomorrow. Please send someone.” After hanging up, most buyers are left wondering, what does passing T0 even mean? How many more trials like T1 and T2 are there? And what should I be looking for at each stage? In the Plastic Injection Mold projects we’ve handled at moldsteells, about 60-70% of new molds pass the initial T0 trial with only minor revisions needed. The other 30-40% require more significant modifications before moving to T1. T0, T1, and T2 aren’t just formalities; each trial corresponds to a clear engineering goal. T0 is for finding structural problems, T1 is for locking in parameters and verifying dimensions, and T2 is for testing mass production stability. Understanding what’s being tested at these three milestones means that when you get that call or receive an ISIR (Initial Sample Inspection Report), you’ll know what to ask, what to challenge, and whether you can sign off.
T0: The Mold’s First Check-Up, Focusing on Structure, Not Dimensions
T0 is the very first trial run after a mold is assembled. In the industry, we say T0 is for finding problems, not for validating results. This run only checks if the mold’s basic structure works. Does it open and close smoothly? Does the ejection system work without sticking? Can the cavity be filled completely (short shots are common)? Is there any flash or burning? Do any mechanisms interfere with each other? The process parameters aren’t locked in yet; the technician is free to adjust settings to get the best-looking part, and the run stops after just a few dozen shots.
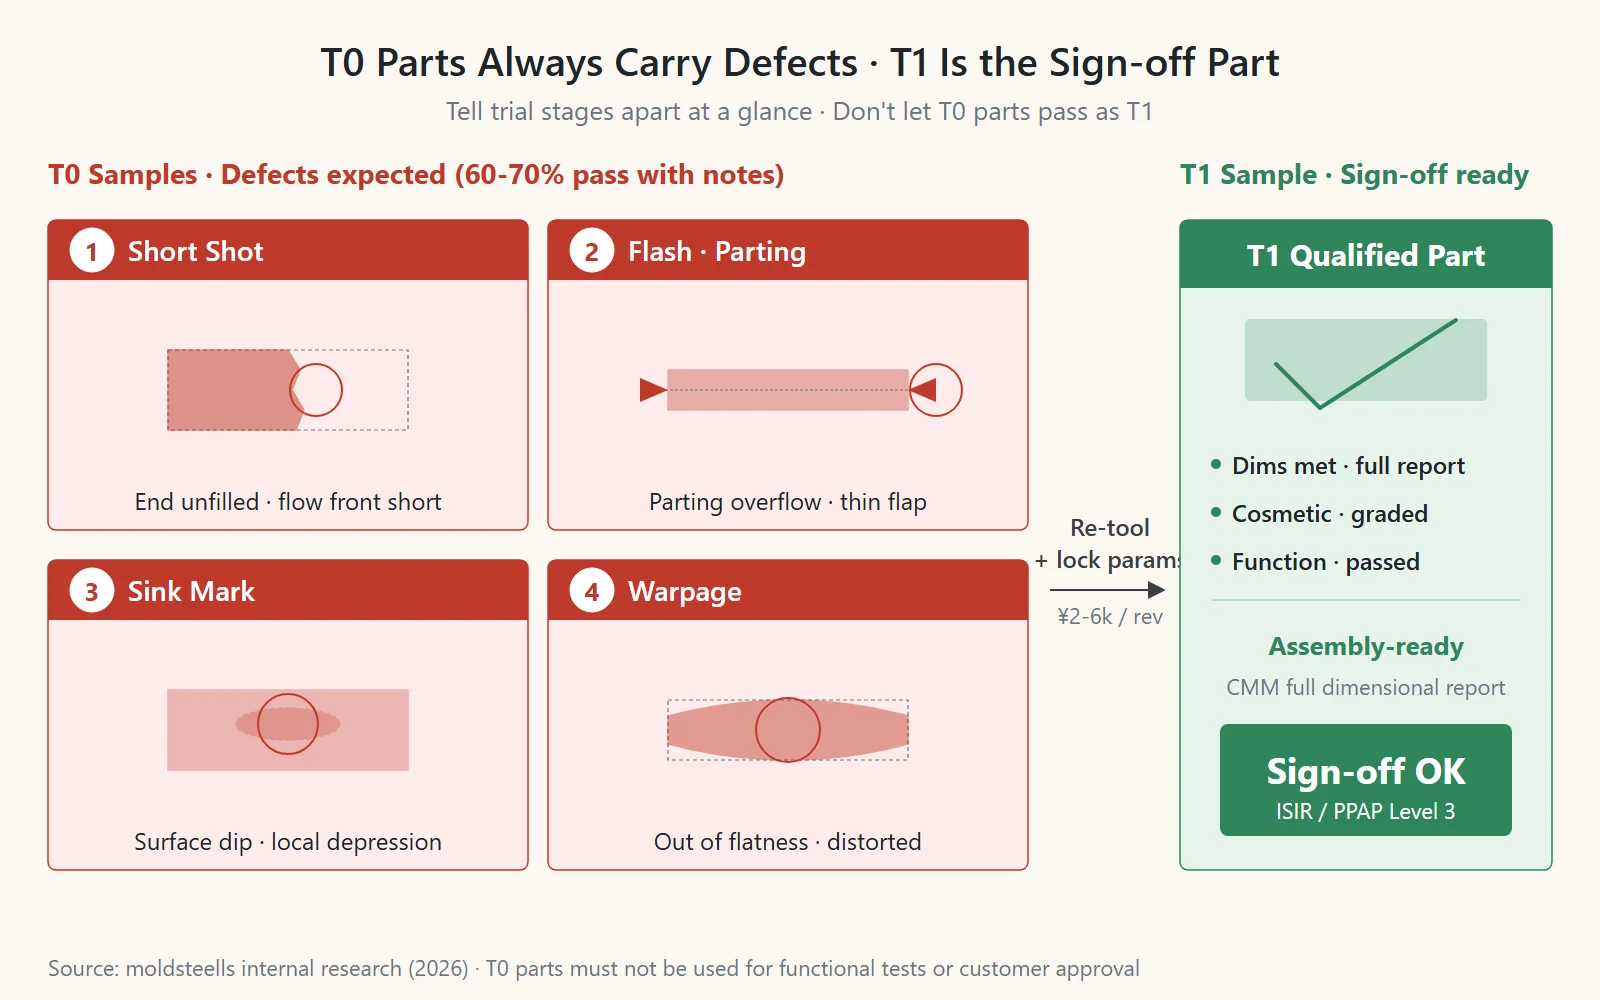
T0 samples will always have defects—short shots, flash, sink marks, warpage, and inaccurate dimensions are the norm. These samples can’t be used for assembly validation, they can’t be accepted as final parts, and they can’t be used for official approval. T0 only validates the mold design itself. Many buyers panic when they see sink marks on a T0 sample during their first trial visit, but there’s no need. It’s completely normal to locate issues at T0. The real danger isn’t that T0 samples have flaws; it’s when a supplier tries to pass off T0 samples as T1 parts. That’s when you’re being misled.
Here’s your T0 checklist: check the mold’s opening and closing action, ejection balance, filling capability, venting (for flash, burning, or gas traps), and any mechanical interference. You should also see if the physical parts match the mold flow analysis. Some shops will also pressure-test the cooling channels at 1.5 times the operating pressure for 30 minutes to check for leaks. At moldsteells, the mold trial is a dedicated step in our project workflow. After this T0 run, our seventh quality control gate, “Trial Report and Sample Inspection,” kicks in. The trial isn’t just a run-and-done event; it’s a formal checkpoint in our process.
T1: Locking in Parameters and the First Dimensional Review Against Your Prints
T1 is the first formal trial after the issues found in T0 have been fixed. From this round onward, the process parameters are locked. Melt temperature, mold temperature, injection speed, holding pressure, holding time, cooling time, and cycle time are all documented in an “Approved Process Sheet.” Any future changes to these parameters will require a new approval process.
The deliverables for T1 should include a full CMM dimensional report, a material certificate of analysis, a classification of appearance defects, a functional assembly test, and that locked-in process sheet. The dimensional report is critical. A CMM should measure every key dimension and compare it against the tolerances on your drawing. For multi-cavity molds, samples must be taken from each cavity; you can’t just measure the same easy-to-reach cavity over and over and call it random sampling. A typical T1 trial involves measuring 10-30 samples, with all critical dimensions checked on the CMM.
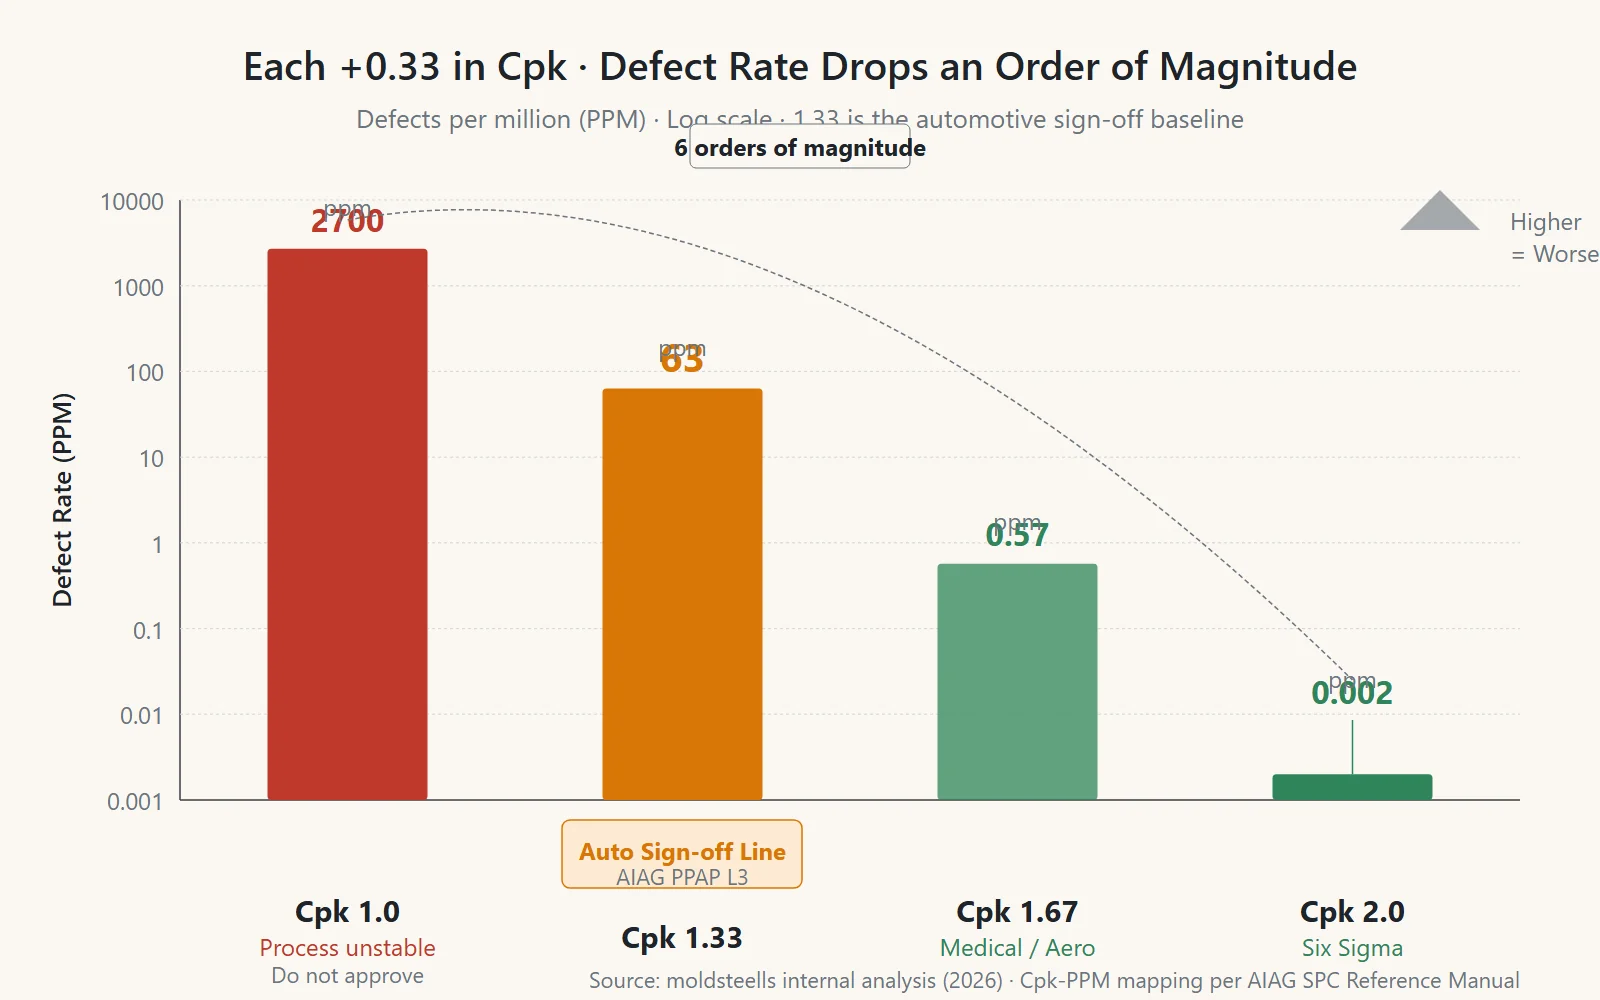
When you get the report, the first thing to do is check the sample size. A Cpk (Process Capability Index, a measure of production stability) study with fewer than 25 samples isn’t a Cpk study—it’s just insufficient data. This is a detail buyers often miss when reviewing reports.
A Cpk of 1.33 is the passing grade in the automotive industry, corresponding to 63 defects per million parts. For medical or aerospace components, the requirement is often 1.67 or even 2.0. For non-critical dimensions, a Cpk of 1.0 might be acceptable, but this must be specified in the control plan beforehand. Anything below 1.0 means the process is not stable and should never be approved. When you receive a Cpk report, don’t just look at the final number. First, check if the sample size is adequate, what the subgroup size is, and whether they used Cpk or Ppk for the calculation. Asking these questions leaves very little room for data manipulation.
T2: The Mass Production Rehearsal for Finalizing PPAP Documentation
T2 is the dress rehearsal before mass production. It involves making minor adjustments based on T1 feedback (like weld repairs, inserts, or parameter optimization) and then running the mold at the production cycle time. The goal is to see if your most critical dimensions remain stable and if the part’s appearance is consistent. This trial is used to conduct a Cpk process capability study, validate the cycle time, test packaging and handling, and complete a full set of PPAP-level documents.
PPAP (Production Part Approval Process) is the approval framework from the North American automotive AIAG system. Level 3 is commonly used for injection molding projects, which require submitting a Part Submission Warrant (PSW), process flow diagram, control plan, FMEA (Failure Mode and Effects Analysis), dimensional and material reports, and Cpk data. The German automotive equivalent is ISIR (Initial Sample Inspection Report), while aerospace and general manufacturing use FAI (First Article Inspection). All three systems aim to validate the process before mass production, but they have different origins and submission requirements, so don’t mix them up. Once you sign off, any changes to the process, material, or mold require a new approval cycle.
T2 is for validation, not discovery. If major problems surface at this stage, it usually means the T1 trial wasn’t thorough enough. For standard parts, a continuous run of 200-500 shots is typical to check for stability. For precision parts in automotive or medical applications, the run can extend to 500-1000 shots or more. There’s no single standard number; the more complex the part and the stricter the industry, the longer the run.
Three-Stage Quick Reference: What’s Tested and What Buyers Should Check
This table summarizes the three stages, making it easier to see the goal, deliverables, and your role at each step.
| Stage | Engineering Goal | Key Deliverables | Buyer’s Action |
|---|---|---|---|
| T0 | Validate mold structure | Samples with short shots/flash, trial parameter log | Witness the trial, review the steel hardness report |
| T1 | Meet dimensional, cosmetic, and functional requirements | Full dimensional report, locked process sheet, material certs | Verify sample size ≥25, check Cpk value |
| T2 | Confirm mass production stability | Cpk data, full PPAP package, cycle time validation | Check for complete PPAP files before signing |
Let’s also be clear about the costs (based on 2026 market rates in the Pearl River and Yangtze River Deltas). A T0 trial typically costs $444–$1,185. A T1 trial can range from a few hundred dollars for simple parts to over $1,500 for complex ones (the wide range is due to full dimensional inspection costs). T2 runs from about $300 to $1,500. Each round of mold modifications and re-trials adds another $300–$900. For a moderately complex part, the total cost from T0 to T2 can be $2,200—$7,400. For automotive-grade precision parts requiring multiple PPAP runs, the total trial cost can reach into the tens of thousands of dollars.
The biggest portion of the trial cost is the injection molding machine time. An 80 to 500-ton press costs $12–$44 per hour, accounting for 40–50% of the total trial fee.
| Cost Item | Percentage |
|---|---|
| Injection Machine Time | 40-50% |
| Labor (Technician + QC) | 15-20% |
| Material (Resin Consumption) | 10-25% |
| Auxiliary Equipment (Mold Temp. Controller, Hot Runner, Robot) | 5-10% |
| Overhead & Profit | 10-15% |
When negotiating your contract, insist that mold trial fees are listed as a separate line item. Don’t accept a bundled price. Bundled prices make it easy for suppliers to play games with the number of trials, and three rounds of T1 modifications could end up costing more than the mold itself.
The 7 Most Common Excuses You’ll Hear During Mold Trials
During the trial phase, buyers are most likely to be misled by these seven common lines. Let’s break down each one: why it’s an excuse and what you should do about it.
1. “The mold is ready. Let’s just go straight to T1.”
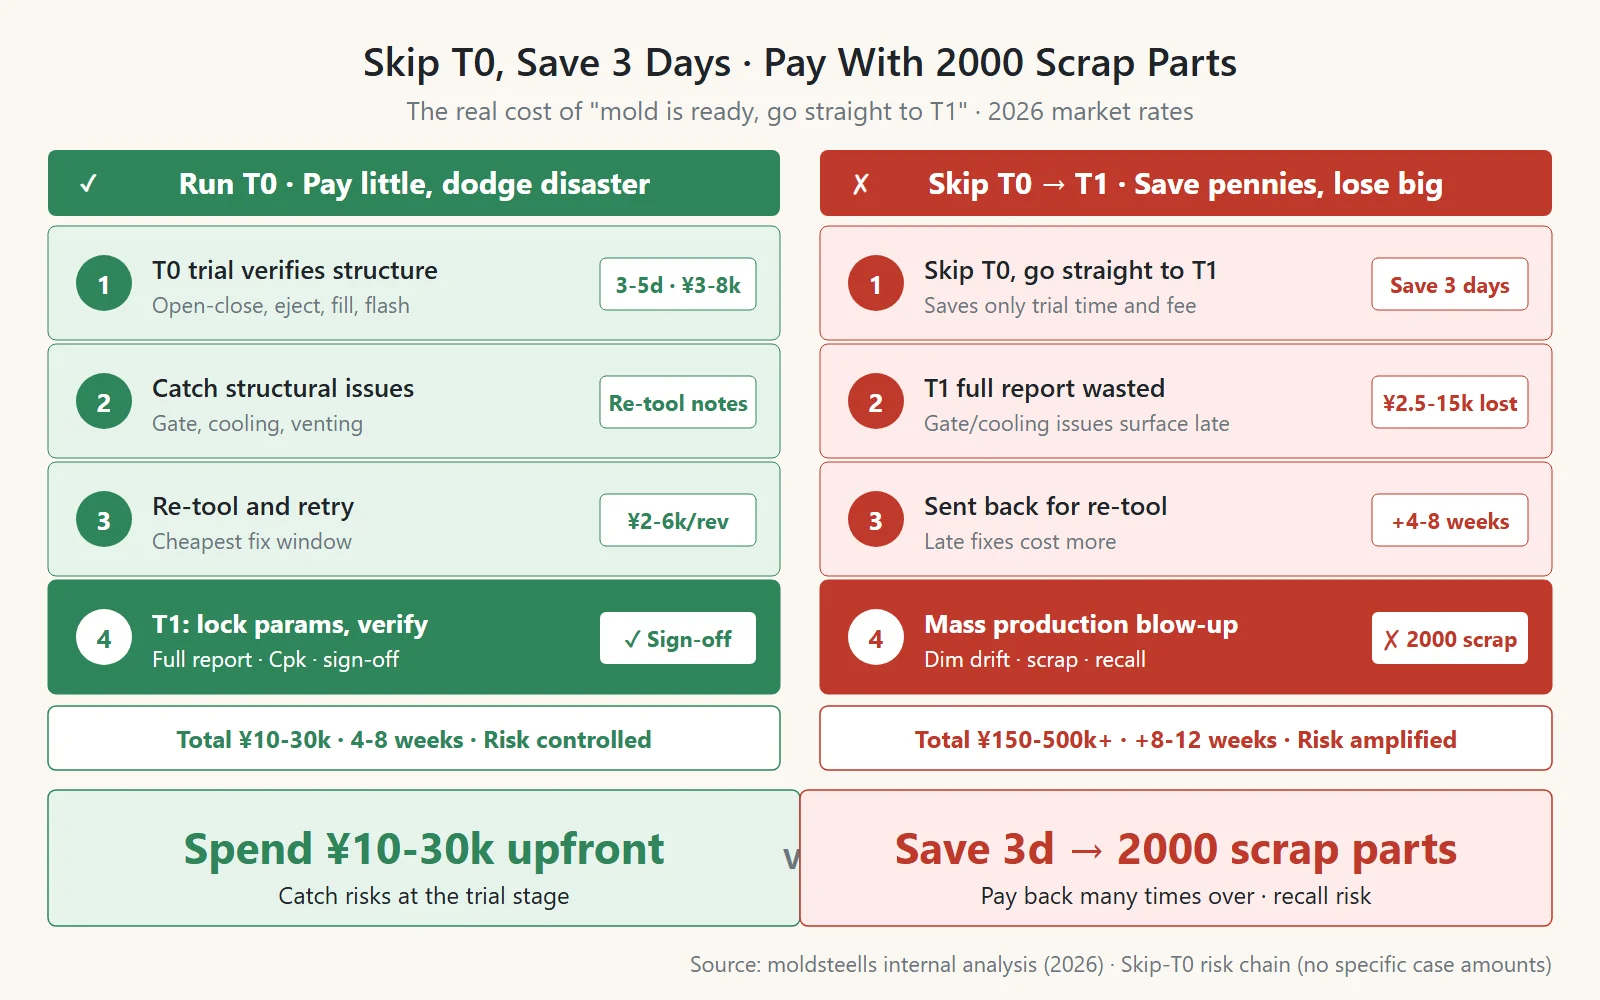
The purpose of T0 is to validate the gating system (gate location and size) and the basic mold structure. Skipping T0 means fundamental structural problems—like incorrect gate locations or imbalanced cooling—won’t be discovered until the full dimensional inspection stage. This wastes an entire dimensional report and delays your project. Insist on a T0 run, even if it’s just for a few dozen shots.
2. “The dimensions are a little off, but we can fix that with machine settings during production.”
Process adjustments have limited impact. They can compensate for some shrinkage but can’t correct for deviations in the steel mold itself. If the Cpk doesn’t meet the standard during mass production and you don’t have a written agreement, the blame will fall on you. Get it in the contract: critical dimensions must have a Cpk of ≥1.33 in production. The contract should also specify who is responsible for rework costs if this target isn’t met.
3. “The cosmetic defects are because of the trial material. It won’t happen with the production-grade resin.”
This is a classic way to blame the material for problems rooted in the mold or process, such as poor surface finish, uneven cooling, inadequate venting, or insufficient holding pressure. While material does affect appearance, most defects are caused by the mold or the process, not the resin grade. Demand a re-test with the specified production material, or sign a material waiver that clearly defines responsibility if the same defects appear after the material is switched.
4. “The dimensional report is all green checkmarks. You can sign with confidence.”
Suppliers often cherry-pick easy-to-measure features like flat surfaces and outer diameters, avoiding complex areas like ribs, gussets, undercuts, side actions, and deep holes. These difficult-to-measure features are often critical for fit or stress concentration. The report looks perfect, but the key dimensions haven’t actually been measured. Provide a 3D-annotated list of inspection points in advance and require all critical features to be measured. Undercuts and internal structures may require a CT scan or a sectioned part for validation.
5. “The Cpk report is fine. It’s 1.34.”
There are four common ways to fake Cpk data: ① selecting only the samples with dimensions closest to the nominal value (sample bias). ② Using a worn CMM probe tip (which can make measurements larger, masking insufficient shrinkage). ③ Reporting Cpk instead of Ppk (Cpk uses short-term, within-subgroup variation and is usually higher than Ppk; suppliers can further inflate Cpk by choosing a narrow time window for their subgroups). ④ Using a wider tolerance band than specified. Insist on stratified random sampling by cavity number, have them calibrate the CMM with a standard sphere in your presence, and specify that you want a Cpk study with a subgroup size of n=5.
6. “We used the specified imported resin for the trial.”
This is a material bait-and-switch. They use expensive imported material to get great results during the trial, then secretly switch to a cheaper Chinese-made alternative for mass production. Differences in melt flow index, shrinkage rate, and mechanical properties will lead to flash, sink marks, and dimensional drift in production. The trial report must include the resin lot number, and a sample should be retained and sealed. For mass production, require a certificate of analysis for each incoming batch of material and verify it against the approved PPAP grade.
7. “T2 is finished. You can sign off now.”
Claiming a trial is complete without running enough shots is a common shortcut. Reporting a successful T0 after only 20-some shots is meaningless because the mold hasn’t reached thermal stability, making any dimensional readings a false positive. If a T2 run meant to validate overnight unmanned operation is interrupted, then production stability hasn’t been proven. Ask for the machine’s operational log (e.g., data from a Euromap 63 interface) and check for unplanned downtime. During T2, critical dimensions should be sampled across different time periods (start-up, stable operation, and end of run) to check for drift.
Frequently Asked Questions
How many shots are enough for a T0 trial?
International standards often suggest 5-20 shots, while common practice in China is 30-50 shots. T0 is about checking basic molding capability, not long-term stability—that’s what T2 is for.
Can we start production if Cpk is below 1.33?
Not for critical dimensions. In the automotive industry, 1.33 is the minimum. For medical and aerospace, it’s 1.67-2.0. A Cpk of 1.0 may be acceptable for non-critical dimensions, but it must be documented in the control plan. If you see a number like 1.27, your first question should be whether the sample size was at least 25.
Who pays for mold modifications during trials?
This should be clarified during the quoting stage. T0 modifications are usually included in the mold price. T1/T2 modifications may be charged separately, typically $300-$900 per round. The cost of three rounds of T1 modifications can add up to more than the mold itself—this is a pitfall to address in your contract.
Is it normal to not be in production right after T2?
It depends on the complexity of the part. Simple parts often pass after T1 or T2. For safety-critical parts in medical or automotive, it’s common to go to T3 or even further. If you’ve completed T2 but haven’t signed off, it’s likely because the PPAP documentation is incomplete or the Cpk is not stable. Don’t rush it; verify the data first.
When you look back at the T0, T1, and T2 stages, what truly determines if a part is ready for production isn’t how pretty the samples look. It’s whether you’ve scrutinized the numbers in that ISIR report—is the sample size at least 25? Is the Cpk over 1.33? Are all the PPAP documents complete? The appearance of the parts at any given trial is less important. Your next step is simple: either check the report against this checklist yourself or send the trial records back to the mold maker and ask them to verify the PPAP documentation first. Once the documents are complete, the numbers are right, and the sample size is sufficient, then it’s safe to sign. As a precision Injection Mold Manufacturer, moldsteells provides you with the ISIR and Cpk data at every trial stage. We believe you should understand the data before you sign off. That’s just our standard practice.